The end of the school year is drawing to a close and I'm always stumped by what to get teachers. We have a lot of teachers in our lives (my son attends 2 different preschools this year) as well as amazing admin staff and his speech therapist. I trolled Pinterest for gift ideas both worthy of the teachers and people who make both our lives and our son's life more enriched as well as something useful and handmade. I couldn't come up with anything I liked until I saw what I'm about to share with you.
I remember giving my own teachers end-of-year gifts as well as holiday gifts back when I was in school. Their desks would be littered with mugs, cookies, candles and ceramic apples. Having some amazing friends in my adult life that are teachers (and two cousins that are teachers), I often hear "I appreciate the thought, but seriously. If I get one more candle I don't know what I'm going to do with it..." With that dialogue running through my mind, I searched for a gift that says "You are an important part of my son's life. We appreciate the work you do and THANK YOU."

I came across some baskets made out of clothesline recently. They looked easy to make and everyone needs a basket for their treasures, phones, desk stuff, notions and other small things, right? I looked at some tutorials, spent some time at my sewing machine and voila! I have 10 baskets to give to deserving educators. After posting a picture of one of them on Instagram, I got dozens of requests on how to make them and I am only too happy to oblige.
These baskets are a great way to use up old or odd-colored thread you have lying around, or keep it neutral and use white, gray or tan. I like to make them bright and colorful, so I tend to go for the pinks, reds, blue and greens. Some of them I dip-dyed after finishing them (and we'll talk more about that later) to match the thread. You'll need a fair amount of thread and your bobbin thread will end up being your outside color, so keep that in mind if you're using neutral inside and a bright color on the outside.
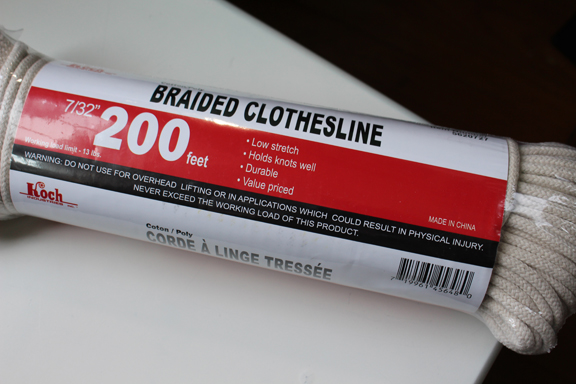
What do you need to make your own sewed basket? You'll need clothesline - and you want to make sure it's 100% cotton, not too thick and not stretchy. I went with 7/32" thickness and found it easily on Amazon. The one I got had 200 feet and I was able to make 3 medium-sized baskets as well as a small one with the leftovers. It's not easy to start a new clothesline in the middle of a basket (not like joining in new yarn when the skein runs out), so I always make sure I have enough to make it through a basket and save my little leftover bits for small bowls and baskets. Make sure you have a solid sewing machine that has a zigzag stitch and plenty of elbow room.
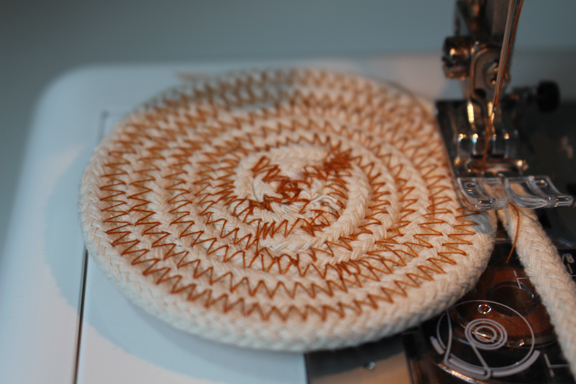
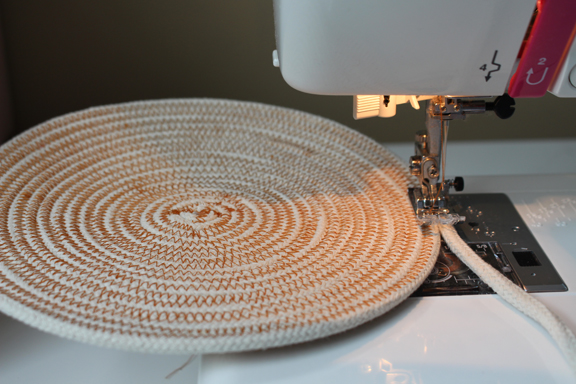
 Start your center base by circling your clothesline around itself into a circle about the size of a quarter.

Then, making sure you're on the zigzag stitch and that the tail attached to the clothesline is coming off to the right side, sew across, then across the other way (making an "x") through the small base. If you want you can go across again and again, making it into 1/8's, but I found an "x" works just fine.


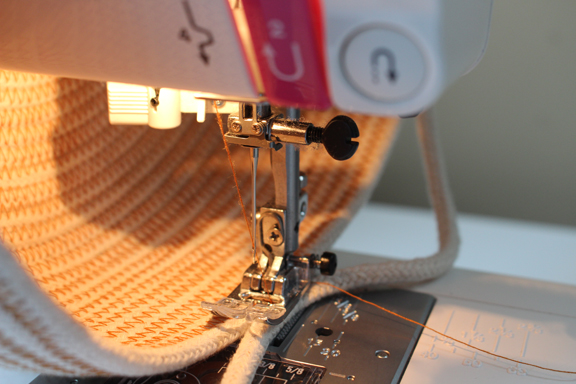
Now start to turn your work counter-clockwise, and this is the key element - be sure that when you zigzag that you're grabbing part of the clothesline from the existing circle and the new added piece (you're basically working in the ditch between the two) and that you're attaching them together. If you miss one side it won't attach and it can't stay together. Make sense? Continue doing that, turning it slowly and letting your machine feed the new clothesline in. One other thing worth mentioning is that they don't have to be perfect. These are handmade gifts! Part of the charm is some wonky stitches or changing your thread color halfway through. Embrace any weirdness happening and roll with it - that's what makes each one unique.
Keep doing this, letting your work hang over and out, just make sure you're keeping your base flat. The bigger the base, the harder it is to manage, so start thinking about how wide across you want your base to be before things get out of hand and difficult to control.
Keep doing this until you reach the desired base diameter. For this one, I went to about 8" across.
 If you're wanting to make a bunch of trivets or coasters, this is where you secure off the end and finish up. If you're wanting to make a basket or bowl, this is where we start turning up the edges, making the bowl shape. Grab your base and pull it up so it's vertical. I pull it up so the base is flush against the side of my machine. Using the side of the machine is a great way to keep the bowl shape consistent.
 Keep working around in a circle the way you've been doing, just keep your work against your machine and go for as much as you want the height/depth of the bowl or basket to be. I went about 3.5" deep. The clothesline may need a little more help now that you're shaping the bowl, so just be sure it's right up against the work. If you're afraid of putting your fingers too close to the needle, use a stiletto or a chopstick as a pushing device.
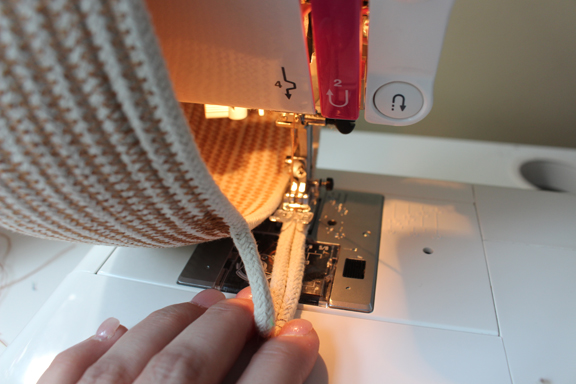
 Great! If you're making bowls, go for the desired depth and finish off! If you're wanting to make a basket and add in handles, go to the desired depth, then pull away the clothesline to make the actual handle. Be sure to backstitch a few times before you pull the clothesline away. This will add stability.
 Cut your thread, make your loop, then reattach and start stitching again. Be sure to backstitch again a few times when you join back in. I like to mark the opposite side of the basket so I can get the handles even, but maybe you just want one or want to wing it. Anything goes!
 Now you have a decision to make. Do you want a single loop for the handle or do you want to make it stronger and shore it up? I like to go a few times around, and how many times you do that is entirely up to you. Just keep the handle loops together and don't rush it.
 Once you've gone around enough (3 times in this case), it's time to wrap things up.

Cut your clothesline and tuck it into one of the sides, backstitching as you come to it.

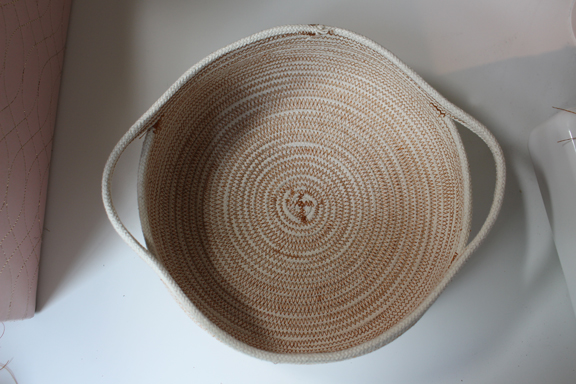 Each basket is so different! Finish your end off with a swirl, or make a really deep basket and attach a leather strap to make it a beach bag. Use self-striping thread or paint or dye the clothesline before you start to sew. Wrap the clothesline in fabric as you work for more of a scrapy feel, or spray paint it when you're all done.
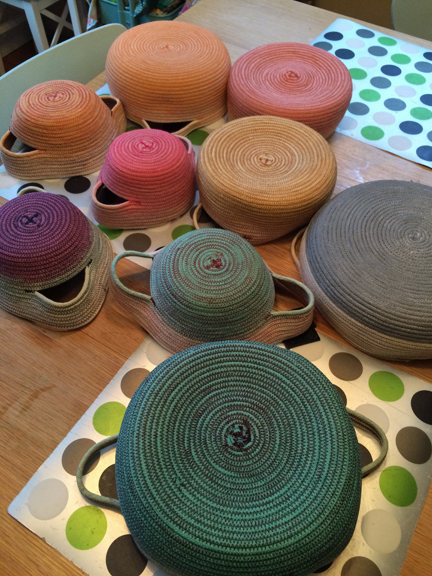
On some baskets I painted the bottom part (I really like the look of just a dip-dye or a partial paint job) or let it sit in a bowl of dye for a hint of color. Make each basket unique and put your own look and finishing touches on it. If you can find out the recipients favorite color, all the better.
Happy making, readers!